.jpg)

Switching your cars or light-commercial vehicles to electric propulsion is only half the journey; the other half is making sure each vehicle starts the day fully charged. When you install EV charger at home you gain control over energy costs, sidestep queueing at public stations and guarantee daily readiness. The following guide walks you through every practical and financial aspect so you can roll out domestic charging infrastructure with the same rigour you apply to depot or public networks.
Understanding Home EV Charger Installation

Installing a dedicated unit on your own premises gives you predictable overnight charging and lets you use cheaper off-peak tariffs. Rather than competing with public users, you simply plug in when the vehicle returns and wake up to a full battery. That certainty is invaluable when route planning or monitoring total cost of ownership.
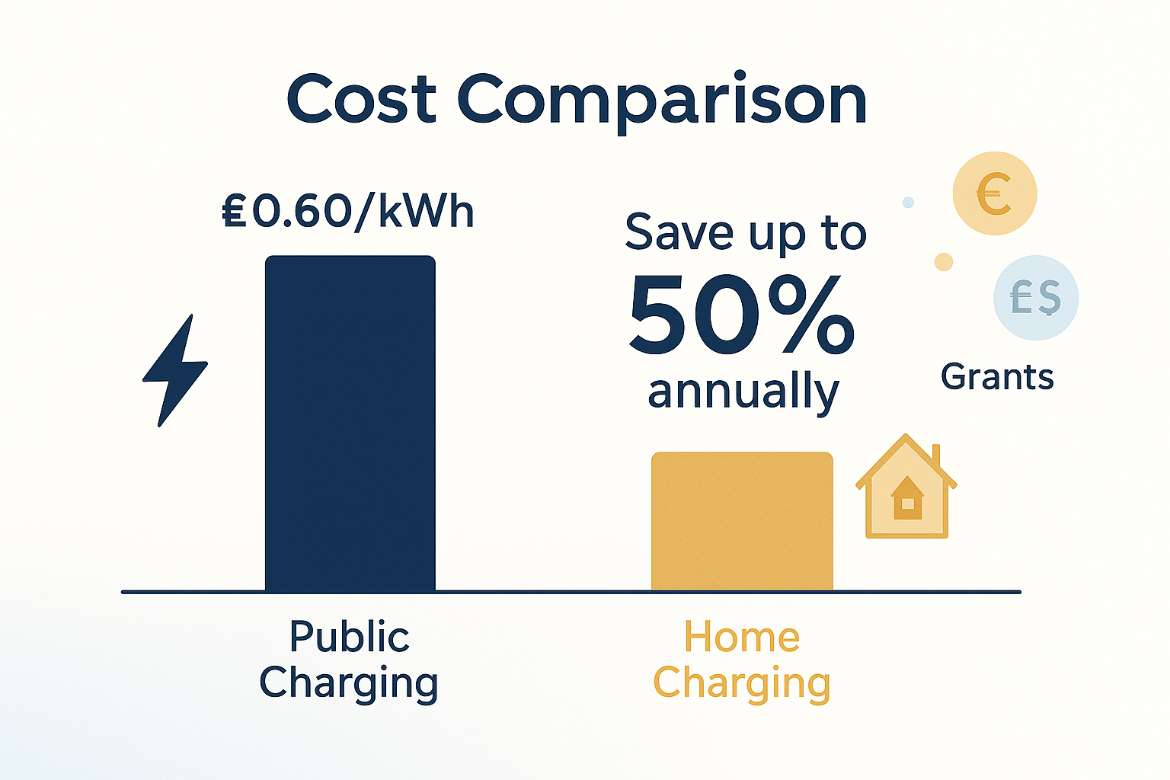
Public chargers will remain essential for en-route top-ups, yet their tariffs are usually higher than domestic electricity. By contrast, when you install EV charger at home you pay your household rate and avoid idle fees. Over the life of each vehicle the savings dwarf the up-front outlay.
Three technologies dominate the charging landscape:
• Level 1 uses a three-pin 230 V socket. No installation work is needed but you gain just 6–8 miles of range per hour – far too slow for daily fleet use.
• Level 2 runs on a dedicated 240-volt circuit. It refills most batteries within four to six hours, striking the right balance between hardware price and charging speed for home and small-fleet scenarios. Learn more about best home charging stations.
• DC fast chargers deliver up to 80 % in 20–30 minutes. Their equipment cost and grid demand push them into commercial sites rather than homes.
Evaluating Installation Requirements

A 240-volt circuit is mandatory for Level 2. New builds often have spare breaker capacity, but older properties may need a panel upgrade before you install EV charger at home. Ignoring this step risks nuisance trips or, worse, overheating cables.
Start with a load calculation: lights, HVAC, kitchen appliances and now an EV charger all draw on the same supply. A licensed electrician should verify whether the incoming service and consumer unit can tolerate an extra 32–48 A. If not, factor in an upgrade when budgeting.
The next decision is hardwired versus plug-in. A hardwired unit connects directly to the circuit, creating a sealed system that shrugs off weather and tampering. A plug-in charger uses a 240 V socket, making removal or relocation simple – useful if you lease the property or plan to rotate assets. Whichever route you choose, confirm that the enclosure carries outdoor protection to at least IP66 when mounted outside.
You also need to consider cable routing. A location close to the distribution board keeps conduit runs short, reducing copper costs. If you prefer a driveway installation, measure the distance precisely; every extra metre raises both material and labour figures. Smart planning at this stage keeps the overall project lean when you finally install EV charger at home.
Cost Considerations and Incentives
The raw figures break down as follows:
• Level 1 equipment lands between £150 and £300 but delivers inadequate performance for operational fleets.
• Level 2 hardware and standard installation typically range from £500 to £1,200, a small premium that buys a five-fold cut in charging time.
Those numbers exclude panel upgrades or long trenching runs. Even so, the long-term economics work decisively in your favour once you install EV charger at home. Night-rate electricity can cost half of daytime public tariffs, and there are no parking or connection fees. When multiplied by hundreds of sessions per vehicle each year, the annual savings soon overtake the capital spend.
To sweeten the proposition further, the UK’s OZEV grant can offset a significant slice of the bill. Only OZEV-approved installers can administer the grant, so gather itemised quotations from at least three providers. Competitive tendering often uncovers variations of several hundred pounds on the same specification.
Ignoring incentives or settling on the first quote are common mistakes. A disciplined procurement strategy – the same approach you already apply to public charging infrastructure – keeps capital efficiency high when you install EV charger at home.
Choosing the Right Charger
Technical capability matters just as much in domestic settings as it does in public forecourts. The Exicom 11 kW Smart Spin Air EV AC Charger illustrates the current state of the art:
• App or RFID card for EV charging delivers user authentication equal to depot hardware.
• CE and ARAI certification proves compliance with safety and performance benchmarks, a non-negotiable factor when you install EV charger at home.
• Smart-home compatibility means you can integrate charging with rooftop solar.
While Level 1, Level 2 and DC have been covered, the nuance lies in future-proofing. Pick a unit whose maximum power exceeds today’s vehicle but sits comfortably within your electrical supply. Migrating later from a 7 kW to an 11 kW vehicle takes one minute in software rather than a full rewire.
Avoid the classic errors of choosing the cheapest uncertified device, overlooking smart connectivity or failing to match the plug type to your vehicle. A methodical comparison chart rooted in real-world duty cycles will guide you to the correct specification before you install EV charger at home.
Installation Logistics
Physical siting influences every downstream cost. Mounting the unit adjacent to the distribution board minimises cable, but operational reality may dictate a kerb-side pillar or wall-box further away. Plot the cable run, include protective conduit and budget for additional labour. Transparent planning avoids change-orders once work begins to install EV charger at home.
Outdoor units must resist rain, dust and temperature swings. Look for an IP66 rating, secure gaskets and stainless fixings. Seal every gland and route the tethered cable clear of sharp edges. Weatherproofing done at install prevents water ingress that could trigger RCD trips months later.
Equipment availability is no longer a bottleneck. Many Level 2 chargers, including the Exicom model, appear on top EV chargers in the UK with EMI payment options. Spreading the cost over several months matches fleet cash-flow better than a single lump-sum.
In practice, the installation sequence runs as follows:
- Select the mounting position after verifying cable distance and parking alignment.
- Shut down the main breaker, pull a dedicated 240-V circuit from the panel and route conduit.
- Install the back-plate, connect conductors, seal glands and re-energise.
- Commission the charger through its app or RFID system, then complete a functional test on the vehicle.
Every stage demands strict adherence to wiring regulations; shortcuts can introduce safety hazards. When you install EV charger at home you carry the same duty of care as on a public site.
Leveraging Professional Services
Scale and expertise matter.
• Correct load calculation and regulatory compliance out of the gate.
• Specialist tooling that shortens installation time, minimising vehicle downtime.
• Integration with roaming networks so your home session data aligns with your broader fleet management platform—see smart charging software and EV fleet charging software for examples.
When you install EV charger at home through a vetted partner, you also gain warranty support and a single contact for any future upgrades. Always check credentials, insist on written quotations and confirm that the installer obtains any required permits. A brief site inspection after completion verifies workmanship and keeps insurance records tidy.
Frequently Asked Questions
Q1. How much to install EV charger at home UK?
A typical Level 2 installation, including standard cabling, falls between £500 and £1,200. Assessments, panel upgrades or long cable runs will add to that figure.
Q2. How much does it cost to install EV charger at home?
Outside the UK you will see similar hardware prices, but labour rates and permit fees vary. Plan for the equivalent of £500–£1,200 plus any electrical upgrades.
Q3. Do I need to upgrade my consumer unit before installation?
If the existing panel cannot support a dedicated 240-V 32–48 A circuit, an upgrade is essential to prevent overloads and comply with regulations.
Q4. Why choose a Level 2 charger over leaving the vehicle on a three-pin plug?
Level 2 replenishes the battery in four to six hours, whereas a three-pin Level 1 adds only 6–8 miles of range per hour – impractical for daily fleet readiness.
Q5. What should I do if my charger trips the breaker during heavy rain?
First, confirm the enclosure carries at least an IP66 rating and that all glands are sealed. If the issue persists, call your installer for a waterproofing inspection.
Q6. Can I claim the OZEV grant after installation?
No. The grant must be arranged in advance through an OZEV-approved installer; post-installation claims are not accepted. Plan the paperwork before you install EV charger at home.
.jpeg)